Every damaged floor call comes down to one question that cannot be answered over the phone: did the damage stop in the finish, reach the wood, or go all the way through it? Where it stopped decides whether this is an afternoon, a week, or a new floor.
Updated September 3, 2026·17 min read·By Angel Hardwood Floor Corp
The short answer
Almost every repair question is really one question: how deep did it go? Damage that stopped in the finish — scratches, scuffs, dull traffic lanes, cloudy patches — comes off with abrasion, often with a maintenance coat rather than a full refinish. Damage that soaked into the wood — black pet staining, water rings, deep gouges — needs aggressive sanding or board replacement. Damage that went through the boards into the subfloor is not a flooring job yet; it is a drying job first.
The expensive mistake is repairing before the moisture is gone. A floor that has taken water looks ready long before it is, and new boards laced into a subfloor that is still wet will cup, gap or lift within a season and have to be done a second time.
Nobody calls a flooring contractor about a floor they are happy with. The calls come after the dishwasher hose let go overnight, after the dog was sick in the hallway and the spot went black, after the piano moved and left four gouges across the dining room, or after someone finally admitted that the squeak at the top of the stairs has been getting louder for two years.
What almost never comes with those calls is a sense of scale. A homeowner in Naperville looking at a dark ring in front of the fridge genuinely cannot tell whether they are looking at a two-hour repair or the end of that floor — and the honest answer is that neither can we, over the phone. But the logic that produces the answer is not complicated, and knowing it before anyone quotes you is worth a great deal. It tells you which questions to ask, which promises should make you suspicious, and what to do in the meantime so you do not make the repair harder than it needs to be.
This guide walks through that logic the way we walk through it on a call across DuPage, Will and Kane County: what each kind of damage actually is, what fixes it, what does not fix it, and where the line sits between a repair and a floor that has reached the end. If your floor is not damaged so much as moving — gaps in January, cupped edges in July — that is a different problem with a different answer, and our guide to gaps, cupping and seasonal movement covers it.
Every wood floor is three layers stacked on top of each other, and damage is classified by which layer it reached. Hold this in your head and most of the rest of the guide follows from it.
The finish. A film a few thousandths of an inch thick, or in the case of a penetrating oil, a hardened zone in the very top of the pores. Nearly all everyday damage stops here. Finish damage is the cheapest kind to fix because the wood underneath is untouched.
The wood itself. On a standard three-quarter-inch solid floor there is roughly a quarter of an inch of usable wood sitting above the tongue — that is the whole budget a floor has for its lifetime of sandings. Damage that has reached into this layer can often be removed, but it is removed by spending some of that budget.
Through the board. Staining or rot that has passed the full thickness, or that has reached the subfloor beneath, is past the point where sanding does anything. There is nothing left to remove without removing the board.
There is a rough home test for the first line, and it takes ten seconds. Put a single drop of water on the damaged spot and on an undamaged spot a few feet away. If both bead up, the finish is intact and whatever you are looking at is in the finish or on top of it. If the drop on the damaged spot darkens the wood or soaks in while the other one beads, the finish is gone there and the wood is exposed — which means moisture has had a way in, and probably has been getting in for a while. Wipe the drop up either way.
Depth is the whole question, and it is the one thing nobody can judge from a photograph. A black mark two inches across can be a surface scorch that abrades off in a minute or a stain that has gone through the board and into the plywood. They look identical from standing height. Any contractor who quotes a stain repair from a phone picture is guessing, and the guess is usually optimistic.
Scratches, dents and traffic lanes
This is the large, ordinary category, and it is also the category where homeowners most often spend more than they need to.
Fine scratching and dulling in the traffic paths — the hallway, the run from the back door to the kitchen, the arc a dining chair scribes — is grit doing what grit does. It is abrasion of the finish, not damage to the wood. The National Wood Flooring Association's own description of the alternative to a full refinish is exactly this situation: “When your floors start to look a little dull, a maintenance coat may be the solution. A maintenance coat involves cleaning the existing floor finish, then lightly sanding it, and application of a fresh new coat.”
That is the single most under-asked-for service in this trade. It goes by several names — maintenance coat, screen and recoat, buff and coat — and it means abrading the existing finish just enough to give a new coat something to grip, then coating over it. No drum sander, no dust containment operation, no bare wood, and a fraction of the cost and disruption of a full sand. The catch is timing: it only works while the finish is still continuous. Once the wear has gone through to bare wood in the traffic path, a coat over the top seals in a permanent grey shadow, and the floor has to be sanded. Homeowners who recoat every several years on a floor that gets hard use may never need a full refinish again; homeowners who wait until the hallway has gone grey have already lost that option.
Individual scratches sort by depth on the same logic. A scratch you can see but not catch a fingernail in is in the finish. A scratch your fingernail drops into has reached wood. Surface scratches in a single area can often be abraded and blended locally. Wood-depth scratches in one room can be sanded out if there is wood to spare, but the sanded area then has to be re-stained and re-finished to match, which is where a “small” repair starts pulling in the rest of the room.
Dents are different from scratches in a way that matters: nothing was removed, the wood fibres were crushed. On unfinished or oil-finished wood a shallow dent can sometimes be steamed back up. Under a film finish it cannot, because the film has to be broken to get moisture into the fibre. In practice most dents get filled and blended, or on a floor going to a full sand, they get sanded flat if they are shallow enough. A deep gouge — the kind an appliance dolly leaves — is a board replacement conversation.
Pulling nails and loose finish around a specific area is worth mentioning because it points somewhere else. Finish that is peeling, flaking or lifting in sheets is usually an adhesion failure rather than wear, and adhesion failures come from contamination underneath: wax, a silicone-based polish, an oil soap, or a previous coat applied over a floor that was not properly prepared. That floor does not need a coat. It needs the bad film taken off completely, which is a sanding job. We check for it before quoting rather than after starting, because a recoat over a contaminated floor will fail again in months.
Pet stains: the one that does not sand out
This is the repair that most often ends differently from how the homeowner expects, and the chemistry is worth understanding because it explains why.
Urine is mildly acidic when fresh. As it breaks down it turns alkaline and releases ammonia, and that ammonia reacts with tannins — the natural compounds that give oak its color and its character. Red oak, which is what the overwhelming majority of floors in the western suburbs are made of, is high in tannin. The reaction between the two is what produces the black rings and dark blotches that look welded into the grain, because in a real sense they are: this is not a coating sitting on the wood, it is the wood itself having changed color from the inside.
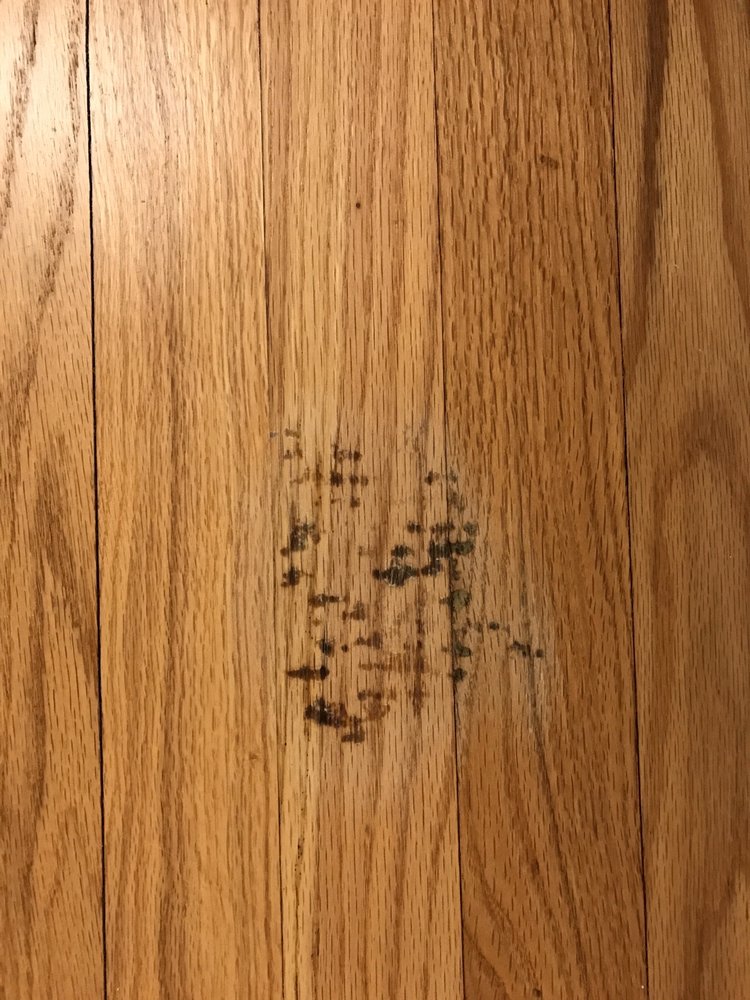
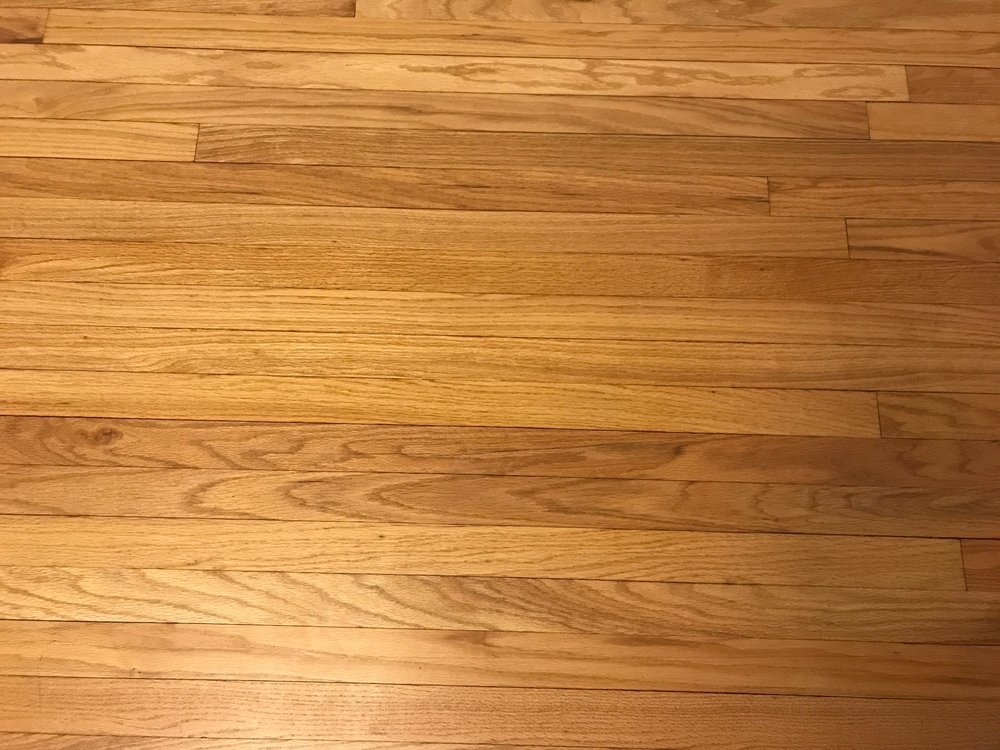
Before — dark spotting concentrated on two boards of a narrow-strip red oak floor. From standing height this reads as one small mark; the question is how far down it went.After — on this floor the staining was shallow enough to sand out and blend. That is the good outcome, and it is not the outcome every time.
A normal sanding pass removes a very thin layer — enough to take off the finish and a fraction of the wood beneath it. That is plenty for finish damage and for light surface discoloration. It is nowhere near enough for a stain that has travelled an eighth of an inch or more into the board, and long-standing pet staining routinely has. Sanding into a deep stain often makes the situation look worse before it looks better, because the mark widens as you go down. Some of these marks run past the top of the tongue, which is as deep as anyone can sand, and at that point the honest answer is that the discoloration is not coming out by sanding, by bleaching, or by hiding it under a darker stain.
There are two other realities that come with pet damage specifically. The first is odor. Uric acid crystals form in the wood and in whatever is underneath it, and they reactivate whenever they get damp — which is why a floor that smells fine in February can smell again in July. Replacing the stained boards without treating or replacing what is under them can leave the smell in the house. The second is that pet damage is rarely a single spot. Animals return to the same places, so what looks like one bad board at the top of the stairs is often a pattern that continues under the runner, behind the door, and along the wall in the next room. We look for the pattern, not just the spot you called about.
None of that means a pet-damaged floor is a lost cause. A large share of them are entirely fixable, and the picture above is one. It means the assessment has to happen before anyone promises an outcome, and it means the realistic plan for a badly stained area is usually board replacement rather than sanding. Our floor repair page covers the process in more detail.
Water damage and the first 48 hours
Water is the most common serious damage a wood floor takes in this part of Illinois, and unlike almost everything else in this guide, what happens in the first day or two genuinely changes the outcome.
The sources are predictable. A supply line to a refrigerator ice maker or a dishwasher, which fails quietly and often overnight. A washing machine hose. A water heater that lets go. A frozen pipe in an exterior wall in January. A toilet supply. Upstairs, a bathroom that has been weeping around the flange for a year and finally shows itself as a stain in the ceiling below. Downstairs and below grade, a sump pump that quit during a storm, or a sewer or drain that backed up. In the western suburbs, that last group is its own category, and it is worth its own section.
What matters is speed, and specifically speed on the water rather than on the floor. Restoration guidance is consistent that the first 24 hours are where the outcome is decided, and that once saturation has continued past roughly 48 hours, permanent cupping, crowning and subfloor delamination become progressively more likely. Wood absorbs from the bottom and the edges, swells, and lifts at the seams; the longer it stays wet, the more of that becomes set rather than recoverable.
The practical order on the day is unglamorous:
Stop the water. Shut the supply at the appliance if it has a valve, at the main if it does not. Everything after this is wasted effort until the source stops.
Get standing water off the floor immediately — towels, a wet vac, whatever moves it fastest. Every minute of standing water is more absorption at the board edges and through the seams.
Lift what is on top of it. Rugs, rug pads, cardboard boxes, furniture with metal or stained wood feet. A wet rug pad holds water against the floor and will print or stain it; furniture feet on a wet floor leave marks that outlast the flood.
Get air moving. Fans across the surface, dehumidifier running, and in a heating-season event, the furnace helping rather than a closed-up room.
Photograph everything before you clean it up. If there is any chance of a claim, the photos taken in the first hour are the ones that matter. Nobody regrets taking them.
Do not put a fan directly on one spot at full blast for days. Drying one area far faster than the boards around it is how a floor ends up with a permanent step in it.
What we ask homeowners not to do is start repairs. Not filler, not a rug over the top, and above all not sanding. Which brings us to the part of a water job that takes the longest and shows the least.
Why nobody should sand a wet floor
Wood gives up moisture from the outside in. The surface of a floor that took water dries within days and looks and feels finished long before the core of the boards and the subfloor beneath them have caught up. Residential drying with professional equipment commonly runs several days for the structure; wood floors specifically can take considerably longer, and in a bad case — a slow leak that ran for months, or water that got beneath a glued or floating floor — the honest timeline runs into weeks.
Sanding into that is the mistake that turns a repairable floor into a permanently damaged one. A floor that is still holding moisture is sitting swollen and cupped, with the board edges high. Sand it flat in that state and you have removed wood from the high edges. When the boards finally dry and shrink back, those edges are now low, and the floor is crowned — the opposite defect, harder to correct, and sometimes not correctable at all because there is no longer enough wood to sand it flat a second time. We cover the same trap from the seasonal-movement side in the gaps and cupping guide, because it arrives from both directions.
The right sequence is boring and worth insisting on:
Find and stop the source. Repairing a floor over an unresolved leak buys you a repeat.
Dry it properly, with equipment if the event was significant, and with patience if it was not.
Meter the wood and the subfloor, not just the surface. General industry practice is that the flooring and the subfloor beneath it should be close to each other — within a couple of percentage points — and that both should be back in the normal range for a conditioned house before anything is sanded or laid.
Re-check after a few days of stable readings. A single dry reading on a warm afternoon is not a dry floor.
Then repair. By this point it is usually clear which boards recovered and which did not, which makes the scope more accurate as well as safer.
Homeowners sometimes hear that sequence as a stall. It is the opposite — it is the part that decides whether the repair is done once or twice. If a contractor offers to sand a floor the week after a flood without metering anything, that is the moment to get a second opinion.
What insurance covers in an Illinois basement
This comes up on nearly every water call, and it is worth knowing the general shape before you make the phone call, because the shape is not intuitive.
The broad principle across standard homeowners policies is that sudden and accidental water damage is generally covered, while gradual damage generally is not. A burst pipe, a water heater that ruptures, a dishwasher or washing machine that fails outright — those are the classic covered events. A supply line that has been weeping behind the cabinet for eight months, a shower pan that has been leaking into the subfloor for two years, or damage attributed to deferred maintenance is usually excluded under the continuous-or-repeated-seepage language most policies carry. This is exactly why the timeline of a leak matters to an adjuster and why the photographs from day one are valuable.
Then there is the category that catches western-suburb homeowners specifically. Basement water that arrives through a drain, a sewer or a sump is not part of the base policy. The Illinois Department of Insurance defines Sewer Back-up and Sump Pump Overflow Coverage as “coverage available for an additional premium to your homeowners insurance policy that pays for damage to your finished basement caused by water or waterborne material which backs up through a sewer, drain or overflow or is discharged from a sump pump overflow,” and it adds plainly that “water seepage is not covered.” The department is equally direct about rising water: flood coverage is a separate purchase, and “standard home insurance policies do not cover flood insurance.”
If you have a finished lower level and you have never checked for that endorsement, check. Sump and sewer backup is one of the most common ways a western-suburb basement floor gets destroyed, it is one of the least commonly covered by default, and the endorsement usually carries its own limit and its own deductible rather than sitting under the main dwelling coverage. We are flooring contractors and not insurance advisors — your agent is the right person to read your actual policy — but this is a question worth asking before you need the answer. If you are choosing a floor for a lower level in the first place, our basement flooring guide covers which materials survive down there.
One practical note on claims. Adjusters frequently want to pay to repair or replace only the affected room. Whether the rest of a continuous floor gets included is a negotiation that turns on whether the damaged area can be made to match, which is a question about your specific floor — its species, its age, its finish, and whether the product is still made. That is a documentable question, and documenting it clearly is part of what a proper assessment produces.
Board replacement, and the word “lacing”
When damage has gone past what sanding can reach, the answer is to take the bad boards out and put good ones in. Done well this is close to invisible. Done badly it produces the rectangular patch everyone has seen in a rental, sitting in the middle of a floor like a scar.
The word to listen for is lacing — also called weaving or interlacing, and covered as its own technique in the NWFA's installation guidelines alongside board replacement for nail-down, glue-down and floating floors. Instead of cutting a neat rectangle and dropping in a matching rectangle, the replacement boards are staggered into the existing field so the end joints of the new work fall into the same random rhythm as the end joints around it. Your eye reads a wood floor partly by that rhythm, so a patch whose joints all line up announces itself no matter how well the color is matched, while a laced repair of the same size disappears.
Lacing costs more than patching, because it means disturbing sound boards that did not need replacing in order to break up the outline. It is almost always worth it in a visible room. In a closet, under where the refrigerator sits, or inside a pantry, a straight patch is a reasonable economy and we will say so.
A few mechanical realities shape what is possible:
Nail-down solid floors are the most forgiving. Individual boards can be cut out and replaced anywhere in the field, and the last board in goes in with its bottom groove removed and glue rather than nails.
Glue-down floors are harder, because the adhesive has to come off the subfloor cleanly before anything new goes down, and old adhesive residue is slow work.
Floating floors do not really get spot-repaired in the middle of a run. The planks are locked to each other rather than fastened down, so reaching a damaged board in the middle of a room can mean unclicking back to it from the nearest wall. Sometimes that is quick. Sometimes it means most of the room comes up.
Engineered floors can be replaced board for board like solid ones, but they cannot always be sanded afterward, which changes the plan — see the section on remaining thickness below.
Prefinished floors introduce a different problem: the replacement board arrives with its finish and its bevelled edges already on it, so the match depends on finding the same product rather than on anyone's skill with a stain.
After replacement, the question is always whether the repair needs to be blended into the surrounding floor or whether the room gets sanded and finished as a whole. On a site-finished floor, sanding and refinishing at least the affected room is usually what makes the repair truly disappear, because it puts one continuous new finish over old wood and new wood alike. On a prefinished floor there is nothing to blend into and the match has to be right out of the box.
Matching wood that went in thirty years ago
The hardest part of a good repair is usually not the carpentry. It is the match, and there are four separate things that have to line up.
Species and grade
Red oak is red oak, but grade is not grade. A 1960s floor in an older neighborhood may be a tighter, clearer, narrower select material than what a lumberyard will hand you today, or it may be a knottier common grade with more character than a modern select board carries. Dropping a clean, uniform new board into a floor full of mineral streak reads as a patch even when the color is perfect, and the reverse is equally true. Matching grade is a sorting job as much as a buying one.
Dimensions and profile
Board width, thickness and the shape of the tongue and groove all have to work. Two-and-a-quarter-inch strip oak is still made and still easy to source, which is why the majority of older floors out here are straightforward to repair. Odd widths, older thicknesses and discontinued profiles are where a repair gets interesting; sometimes the practical answer is to pull sound boards from a closet or from under an appliance to use in the visible room, and put the new material where nobody looks.
Color, and the fact that the floor is older than the patch
Stain can be blended, and matching stain is routine work. What cannot be blended is age. The existing floor has been sitting under UV and under an ageing finish for years or decades, and the new wood has not. On a floor finished in oil-based polyurethane this is pronounced, because that finish ambers continuously — we go into the mechanism in the finishes guide. The consequence for a repair is that a new board matched perfectly on the day can drift over the following year or two, usually toward the surrounding floor rather than away from it, but not always at the same rate. Sanding and refinishing the whole room is what removes this variable entirely, because it resets everything to the same starting point.
Sheen and finish system
A spot repair in satin sitting in a semi-gloss floor is visible from across the room even if the color is exact, because the two reflect light differently. Sheen is easy to match when someone checks it and easy to get wrong when nobody does.
All four of these are why our honest recommendation on a visible room is often board replacement plus refinishing that room, rather than a spot repair alone. It costs more on the day. It is the version that is still invisible in three years.
Squeaks, loose boards and hollow spots
Not all repair calls are about damage you can see. A squeak is a movement problem, and finding what is moving is most of the work.
A squeak is one of three things rubbing: a board against a neighbouring board, a fastener against wood as the board flexes on it, or the subfloor against a joist where the two have separated. The third is the most common in houses built in the 1990s and 2000s subdivision boom, because a subfloor panel that has shrunk slightly away from a joist leaves a gap the panel drops into every time somebody steps on it. That is not a floor defect, and it does not get better on its own.
How it gets fixed depends on access. Where there is an unfinished basement or crawl space beneath, the fix often happens entirely from below — shimming the gap between joist and subfloor, or drawing the two together — with nothing touching the finished floor at all. That is the best outcome and always the first thing we look for. Where there is a finished ceiling underneath, the work has to come from above: fastening down through the flooring into the framing at the right point and concealing it, or in some cases addressing it during a refinish when the floor is already open.
Two related complaints belong here. A hollow or springy patch, especially on a glue-down or an engineered floor, usually means the bond to the subfloor has failed in that area, and it will grow if it is left. A board that moves under your foot on a nail-down floor is a fastening problem, and it is worth attention sooner rather than later, because a board that flexes will eventually split at the tongue and turn a fastening job into a replacement job.
A squeaky floor over a joist gap is also the one repair where a homeowner's own diagnosis is genuinely useful. Note exactly where it happens, whether it happens every time or only in dry weather, and whether it is worse in winter. That is real information and it shortens the visit.
How much wood is left to work with
Every plan in this guide that involves sanding runs into the same limit, and it is a limit the floor was born with.
A standard three-quarter-inch solid floor has around a quarter of an inch of wood above the tongue. That is what is available for the lifetime of the floor, and every full sanding spends a slice of it. Whether a given floor has one sanding left or four is not a formula — the NWFA is explicit that “the number of times a floor can be sanded varies depending on a variety of factors including the skill of the contractor, the equipment used, the thickness of the wear layer, the flatness of the floor and the condition of the floor.” A cupped floor sanded flat spends far more than a flat floor freshened up. A floor that has been through three aggressive sandings by three different crews may have less left than its age suggests.
Engineered floors have a much harder ceiling, because only the veneer on top is real wood over a plywood or composite core. Sanding guidance in this trade puts the practical cutoff at roughly three thirty-seconds of an inch of remaining wear layer — below that, a floor should not be sanded at all, and a thin-veneer product may have been effectively unsandable from the day it was installed. This is not a reason to avoid engineered flooring; it is a reason to know which one you have before planning a repair around sanding.
How we check it is simple and non-destructive if there is any opening in the floor: a floor vent, a threshold, a doorway transition, or the edge under a removed shoe moulding all expose the cross-section of a board. Where nothing is open, a small inspection in an inconspicuous spot answers it definitively. Guessing is not acceptable, because the difference between “this floor has three sandings left” and “this floor has none” is the difference between a repair and a replacement.
The four repair paths, side by side
Nearly every job in this guide resolves into one of four paths, sometimes two of them in combination.
Path
What it fixes
What it will not fix
Disruption
Where it fits
Maintenance coatFinish only
Dullness, fine scratching, tired traffic lanes
Anything that has reached bare wood; any stain in the wood
Lowest. No bare wood, no dust operation
A floor caught before the finish wears through
Spot repair & blendLocalized
Isolated scratches, small marks, a single damaged area
Widespread damage; anything that needs the room to match
Low. Usually hours, in one area
Closets, low-visibility rooms, a natural break in the floor
Board replacementCarpentry
Deep stains, gouges, rot, water-ruined boards, split boards
The colour match on its own — it usually needs finishing after
Moderate. Laced in, then blended or refinished
Pet damage, appliance leaks, localized water events
Full sand & refinishWhole room
Everything sanding can reach, and it makes repairs disappear
Damage below the sandable layer; a floor with no wood left
Highest. Rooms empty, days of work, cure time after
Widespread wear, or any repair that has to be invisible
General repair options and how they behave — not a quote, and not a substitute for an in-person assessment of your floor.
The NWFA's own line on when to stop repairing and start sanding is a useful sanity check: “A complete sand and refinish is recommended when there is damage to the wood floor like deep scratches, dents, and other flooring damage. It is also recommended when the finish has worn away, and the bare wood is exposed.”
What actually moves the price
We publish the repair ranges we see most often on our floor repair page, and what a full sand and refinish runs across DuPage, Will and Kane County is broken down in the refinishing cost guide. Rather than repeat numbers here, it is more useful to know which variables move them, because those are the things you can actually describe on the phone.
How many separate areas. Three marks in three rooms is a meaningfully bigger job than three marks in one room, because each area is its own setup, its own blend and its own match.
Whether the room has to be refinished afterward. This is usually the single biggest fork. A blended spot repair and a board replacement plus a full room refinish are different orders of magnitude, and which one you need is decided by visibility and by how well the floor can be matched.
How available the material is. Common strip oak in a standard width is easy. A discontinued prefinished product, an unusual width, or an old thickness turns sourcing into a real part of the job — and occasionally into the reason a repair is not possible as specified.
What is under the floor. A subfloor that has to be cut out and replaced, or adhesive that has to come off a slab, is work that happens before any flooring goes down and is invisible in the finished result.
Access. Whether a squeak can be reached from an unfinished basement rather than through the finished floor above changes the job completely.
Stairs, thresholds and trim. Stair treads and nosings are slow, careful work compared with open floor, and transitions between rooms often need to be rebuilt when boards around them are replaced. Our fixture refinishing page covers the stair, trim and threshold side.
Whether anyone has already tried to fix it. Wood filler forced into a gap, a mismatched patch, or a coat of polyurethane over a contaminated area all have to be undone before the real repair begins.
When repair stops making sense
Part of an honest assessment is being willing to say that a floor has reached the end. The signals are reasonably clear.
There is no sandable wood left. Whether it is a solid floor that has been through several sandings or an engineered floor with a thin veneer, if the layer is gone the options are gone with it.
The damage is everywhere rather than somewhere. Deep staining in four rooms is not a repair job, and chasing dozens of patches costs more than replacing the field.
The subfloor is compromised. If the panels beneath have swelled, delaminated or rotted, the floor above them has to come up regardless of its own condition.
The material does not exist any more and the visible area cannot be made to match by any route, including borrowing boards from elsewhere in the house.
The floor is failing structurally — widespread buckling, boards lifting off the subfloor, hollow across large areas.
Even then the news is not necessarily bad. Replacement can be scoped room by room where there is a natural break, and if a floor is coming out anyway, that is the moment to reconsider the material rather than replace like for like — our floor installation and hardwood flooring pages cover what goes back in, and the installation cost guide covers what that runs out here.
Two kinds of repair call out here
The housing stock across the western suburbs splits fairly cleanly, and each half generates a different kind of repair call.
Older homes: downtown Naperville, Wheaton, Geneva, St. Charles, Batavia
These are narrow-strip solid oak floors, frequently with several generations of finish on them and occasionally with wax under a later coat of polyurethane. The repairs here are radiator and pipe stains, decades of furniture and pet history, patched-over openings where a wall or a heating register moved, and boards damaged during past renovations. The good news on these floors is thickness: an old solid floor usually has plenty of wood left, which keeps the full range of options open, and the material is common enough that sourcing a match is rarely the obstacle. The thing to check for first is wax, because wax contaminates a new finish and has to be removed rather than sanded through.
1990s and 2000s subdivisions: Plainfield, Oswego, Bolingbrook, Romeoville, Aurora
Here the calls skew toward appliance leaks in open-plan kitchens, pet damage in hallways and by back doors, squeaks from subfloor panels that have shrunk away from their joists, and lower-level water from a sump or a backup. Two things matter more on these houses. First, whether the floor is solid or engineered, because it changes what is possible; a lot of what went into these homes is engineered, and veneer thickness varies enormously between products. Second, that the open floor plan is unforgiving of partial work — there is often no doorway or threshold at which a repair can honestly stop, so what would be a one-room refinish in an older house becomes a much larger area here. We cover the full service area across DuPage, Will and Kane County on our locations page, and you can see finished work on the project gallery.
What we check on a repair estimate
A repair estimate is mostly diagnosis. By the time we leave, we want answers to the following.
How deep the damage goes, tested rather than eyeballed.
Whether the floor is solid or engineered, and how much sandable material is left above the tongue or in the veneer.
Whether it is site-finished or prefinished, because that decides whether the repair can be blended or has to be matched from a product.
Whether the moisture source is resolved, and what the wood and subfloor are reading now.
What is underneath — subfloor type and condition, access from below, and whether adhesive is involved.
Whether the finish is contaminated, particularly with wax or an oil soap, which rules out recoating.
Where the repair can honestly stop — the nearest doorway, threshold or change in board direction — and what that means for the size of the job.
Whether the material can be matched, and if not, what the realistic alternatives are.
We would rather tell you at the estimate that a floor needs replacing than take a repair fee for work that will not hold. And when the answer is genuinely good news — which it often is, because a great many alarming-looking marks are shallow — we will tell you that too.
Not sure how bad it is?
We will come out anywhere in DuPage, Will or Kane County, check how deep the damage goes and how much wood is left, and tell you straight whether it is a repair, a refinish, or a replacement. No obligation either way.
There is a quick test you can do yourself. Put one drop of water on the damaged spot and one on clean floor a few feet away. If both bead up and sit there, the finish is intact and whatever you are looking at is in the finish — which is the cheap kind of damage. If the drop on the damaged spot soaks in or darkens the wood while the other one beads, the finish is gone there and the wood is exposed. For scratches, use a fingernail: one you can see but not catch a nail in is in the finish, one your nail drops into has reached wood. Neither test tells you how deep a dark stain goes, which is the one thing that has to be checked in person.
Usually, but only if what is underneath gets dealt with too. Urine that soaked through a board did not stop at the board — uric acid crystals end up in the subfloor as well, and they reactivate whenever the house gets humid, which is why a floor that smells fine in February smells again in July. Replacing the stained boards and leaving a saturated subfloor beneath them puts a clean floor over the source of the odor. When we find that, the plan includes treating or cutting out the affected subfloor before any new flooring goes down. We will tell you at the estimate if that is what we are looking at, because it changes the scope.
Later than most people want to hear, and the wait is the part that protects you. Wood dries from the outside in, so a floor whose surface feels dry can still be holding moisture in the core of the boards and in the subfloor underneath. Sanding or laying new boards into that leaves you with a floor that moves, gaps or crowns once it finally dries, and the work has to be done twice. The right order is to stop the source, dry the area properly, then meter both the flooring and the subfloor and wait until the readings are stable and close to each other. For a small appliance leak that is often days. For a larger event it can be weeks. We would rather come out twice than sand a wet floor.
It depends almost entirely on whether the damage was sudden or gradual. Standard policies generally cover sudden and accidental water damage — a burst pipe, a ruptured water heater, a dishwasher or washing machine that failed outright. They generally exclude gradual damage, including the continuous or repeated seepage language most policies carry, so a supply line that had been weeping behind a cabinet for months is often not covered. Basement water that comes up through a drain, a sewer or a sump is its own category and usually needs a separate endorsement. We are flooring contractors rather than insurance advisors, so your agent is the right person to read your actual policy — but photograph the damage before you clean anything up, because the pictures from the first hour are the ones that matter.
On a nail-down solid or engineered floor, individual boards can be taken out and replaced anywhere in the field — it does not have to reach a wall. What matters is how the new boards are worked in. Cutting a neat rectangle and dropping in a matching rectangle produces a patch your eye picks out immediately, because the end joints all line up where the rest of the floor is random. Lacing the replacement boards into the surrounding field, so the joints fall into the same rhythm, is what makes a repair disappear. Floating floors are the exception: the planks lock to each other rather than to the subfloor, so reaching a damaged board in the middle of a room can mean unclicking back to it from the nearest wall.
Yes, and damaged boards can be replaced the same way they can on a solid floor. The difference is what happens afterward. Only the veneer on top of an engineered board is real wood, and if that wear layer is thin the floor cannot be sanded to blend the repair in — so the match has to come from the replacement material itself rather than from a finish applied over the whole room. That makes knowing your veneer thickness the first question rather than the last. We check it at a vent, a threshold or a doorway where the cross-section of a board is visible, which takes a minute and settles what is possible.
On day one, and sometimes permanently, unless the room is refinished. The existing floor has been ageing under UV and under a finish that has been changing colour for years or decades; new wood has not started that process. Stain can be matched, grade and width can be matched, sheen can be matched — age cannot. Sanding and refinishing the whole room removes the problem entirely, because everything old and new gets one continuous new finish at the same starting point. On a prefinished floor there is nothing to blend into, so the match depends on sourcing the same product, which is why we check whether it is still made before promising an invisible repair.
A few things, and they all make the eventual repair harder. Do not force wood filler into a gap or a gouge; it has to come back out and it can contaminate the wood around it. Do not put a rug over a damp spot, which traps moisture against the floor and can print into the finish. Do not steam mop anything, and especially not a floor whose finish has already worn through. Do not try to sand the spot yourself, because a hand-sanded dish in the middle of a floor is visible forever and cannot be sanded out without taking the surrounding area down to meet it. And if water is involved, keep the fans moving air across the whole room rather than blasting one spot, so the floor dries evenly.